December 31, 2011

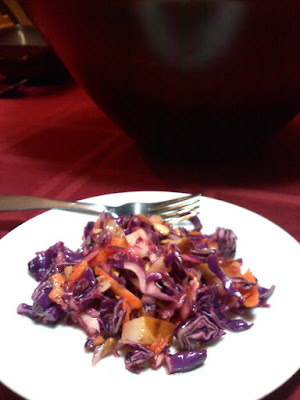
Red Cabbage & Pear Salad with Mango Dressing


I can hardly believe it's almost 2012! Every time I stop to think about it, I'm in shock. Really, it makes me feel old...3 years married, home-owning, closing in on the 5 year college reunion mark OLD.

But that's a good thing. I'm happy with what I've done so far in my life & I look forward to the upcoming years with anticipation of what's to come.

The surest way to make sure my hubby & I have a chance at enjoying a long life together is to feed us well. Incorporating lots of nutrient dense foods into our life will give us energy to handle whatever 2012 & beyond throws at us. I'm ready!


I'm not planning any big new year's resolutions. My main goal is to empty the freezer because it's in dire need of a defrosting. That might not sound too hard, but I have (happily!!) a major grocery shopping problem. So the hard part of emptying the freezer is that I have to stop buying more food. I'm aiming for a defrost in late March. We'll see...maybe by then I can put the contents outside to stay cold while it defrosts? 

This salad was inspired by a jar of Trader Joe's mango butter, a chunk of red cabbage, & some overly ripe pears that were sitting in my fridge. When I googled ways to combine red cabbage & pears, many of the recipes included sliced mango, giving me the idea to use that flavor in the dressing. If you don't have access to a Trader Joe's & can't find mango butter elsewhere, I'm sure you could use apple or pear butter in it's place & add mango slices.

Red Cabbage & Pear Salad with Mango Dressing
Serves 6-8

1/2 head of red cabbage, shredded
1 carrot, grated
1/4 of a large red onion, sliced
1 pear, chopped
1/3 cup apple cider vinegar
2 T extra virgin olive oil
3 T mango butter*
1/4 tsp. sea salt

Combine cabbage, carrot, onion, & pear in a large bowl. Whisk together vinegar, olive oil, mango butter & sea salt. Pour dressing over the salad. Stir & allow to marinate for 30 minutes before serving.

*Feel free to substitute apple or pear butter if you can't find mango butter. If you still want the mango flavor, add a few slices to the salad.

December 29, 2011

Vegetarian Pasta Fagioli


This dish brings me lots of fond memories. Every year my dad would make a huge pot of the white style pasta fagioli & I would pick out all the beans, just eating the noodles. Our house would reek of garlic for days because he used a whole head to make it. Once, he used even more than that, giving it quite a kick.

When I asked him for the recipe, I think he might've been secretly surprised. It was never my favorite dish, plus it has bacon in it. I haven't had it for a few years, though, & lately I was craving the warm flavors. It's a great comfort food!


I skipped the bacon & used liquid smoke for extra flavor. Then I added broccoli for some greens because I love the flavor, color & nutrition it adds. We ate it for lunch & I was happy!

It's not exactly same as my dad's, but it's very close. I cut back on the garlic, but it's still has plenty! Bonus - our house didn't smell like garlic for days. :-)


Vegetarian Pasta Fagioli - White Style
Serves 6

1 T coconut oil
5 cloves garlic, minced
12 oz. elbow macaroni (whole wheat*)
1 cup vegetable broth
3-4 cups water
1 can navy beans (or other white beans), drained
1 tsp. salt
3/4 tsp. black pepper
1/2 tsp. liquid smoke
1 head of broccoli, chopped
parmesan cheese, to taste

In a large pot over medium heat, melt coconut oil. Add garlic cloves and cook until fragrant and lightly browned. Add macaroni, vegetable broth, and 3 cups of water. Cook macaroni for about 7 minutes, or until almost done. Do not drain! Stir in beans, salt, pepper, liquid smoke and broccoli. Add additional water if the liquid all cooked off. Cover and cook for another 5 minutes or until beans and broccoli are heated. Sprinkle with parmesan cheese and serve!

Note: Originally (as you see in the photos), I cooked the broccoli separately. When we heated the leftovers, the broccoli was stirred in & the flavors melded deliciously. If you only like crisp broccoli, I would keep them seperate, but for great flavor, cook with the pasta, as directed above.

*I haven't tried it yet, but I think this dish would be even better with whole wheat macaroni.

December 25, 2011

Merry Christmas!

Merry
Christmas!

Luke 2:11
For unto you is born this day in the city of David a Savior, who is Christ the Lord.

Hallelujah!

Isaiah 9:6
For to us a child is born, to us a son is given; and the government shall be upon his shoulder, and his name shall be called Wonderful Counselor, Mighty God, Everlasting Father, Prince of Peace. 


Always remember that Jesus is the reason for the season!

Luke 2:14
Glory to God in the highest, and on earth peace among those with whom he is pleased!
 

I hope you have a wonderful day!

December 23, 2011

Tequila Lime Glazed Tofu

Don't run away yet just because there's tofu involved! Hear me out first.


I don't love tofu, either. In fact, the first few times I tried it, neither the Bup nor myself really wanted to eat what I made. Since there are so many mixed reviews on soy, I wasn't too concerned with whether we ate it or not. There are plenty of other vegetarian sources of protein that we love, like beans & quinoa!

The general consensus on soy seems to be that in it's whole form (especially when fermented) it has numerous health benefits, but the further it is removed from the whole form, the worse it is for you. Soy isolates are used in many packaged foods, so watch for those. Edamame, tofu, tempeh, miso, & soy milk are all produced from the whole bean, making them ideal sources of soy. Organic is best, to ensure that the soy was not genetically engineered (another scary area in the world of "food").

Since trying tofu for the first time, we've had it very infrequently, but as I've come across recipes that used different prep methods, I've tried a few.

We had tofu scramble (sort of like scrambled eggs, but vegan) & it was okay. I'm not sure why I even bothered, since I don't like scrambled eggs...

My all-time favorite way to eat tofu is actually as a dessert. When mixed with super dark melted chocolate, it makes a delicious & healthy mousse (or pie filling!). It's very rich, but doesn't sit heavily in my stomach like most mousse does.

In its plain form, however, tofu has a consistency that I just don't love. When I discovered this recipe for Tofu Dippers, I gave tofu one final chance. The tofu is thinly sliced, marinated, & broiled, giving it a crisp & flavorful exterior with a slightly chewy middle. If you're going to try tofu, try it like this first! It's a total winner.


I've tried several marinades, & since tofu is so adaptable, they've all been delicious. As I was looking for a new one to try, I found a curry recipe that had lime juice & agave nectar in it. It sounded good, & as soon as I mentioned it to the Bup he immediately said we should add tequila. Tequila is made from the agave plant, so it's a match made it nature! Lime is always perfect with tequila, so we tried it out.


As you can see, I like to char mine. If you don't like it charred, then take it out sooner. It's fun to watch it bubble while it broils...maybe that's just me?

Tequila Lime Glazed Tofu
Serves 2-4

1 block organic extra firm tofu
1/4 c lime juice
3 T tequila
2 T agave nectar
1 T soy sauce (low sodium is best)

Begin by unwrapping and rinsing the block of tofu. Slice it into 4 thin, 2"x3" pieces (stand the block on end and cut down). Press tofu overnight (or at least 4 hours) by placing the pieces between towels and laying a very heavy object on top. I use a super thick cutting board and then put whatever's in my fridge on top of the board.

Once tofu is pressed, mix together the remaining ingredients. Cut tofu into desired pieces - I usually cut each piece into 3 or 4 rectangles. Arrange pieces in a single layer in a shallow dish. Pour marinade over tofu, making sure all of the pieces are coated. Allow to marinate all day (or at least 4 hours). The longer it marinades, the better the flavor.

Preheat broiler. Spray a large baking sheet with cooking spray and arrange tofu on sheet in a single layer. Broil for about 6 minutes per side, watching to make sure it does not burn. Once the tofu is down it should be nicely browned and crisp.

Enjoy with lots of veggies and a fun dipping sauce!

December 21, 2011

Glittery Jars

Over the weekend, I got out the glitter!

I get excited about glitter. I try to restrain myself, because I know many people shy away from it, but really, what's not to love about sparkles everywhere?


I used to (in high school) use that roll-on glitter on my eyelids & sometimes my chest. Maybe I wanted to be like the elf in The Santa Clause...you know, Judy? The elf who made the good hot cocoa - shaken, not stirred? She sparkled from the inside out!


Please tell me you remember that stuff. I can't be the only one.


I decided to make a few homemade gifts & needed jars for them. Mom told me awhile ago that she has a lot of jars, so I raided her supply. The lids needed a little brightening up, so I got out the paints & glitter. 

It was super easy & didn't take much time.  It also didn't require artistic talent...just in case you're worried.

Step 1: Gather several small jars & make sure they are clean.
Step 2: Remove lids.
Step 3: Cover surface with newspaper.
Step 4: Coat lids with paint & let dry.
Step 5: Paint lids with a second coat of paint.
Step 6: Immediately sprinkle wet paint with glitter.
Step 7: Allow to dry thoroughly, at least 12 hours.
Step 8: Fill jars, label them & give as gifts!

Easy!


Some suggestions to fill the cute, glittery jars:


I can't wait to fill them & make pretty labels! Gift-giving always makes me feel crafty.

December 19, 2011

Whole Wheat Cinnamon Raisin Bread


One of my favorite traditions at Christmas is having a special, homemade treat for breakfast on Christmas morning. My mom would always bake on Christmas Eve & the house would smell delicious.

My favorite years were when she'd make sticky buns because I love the inside with all the gooey cinnamony goodness. As a kid, I'd pick out the raisins & walnuts, but now I love them.


It's not quite Christmas, but in anticipation, I baked this yummy bread for the Bup & I to eat this week. I found myself eating the outside & saving the soft inner swirl for last, just like with the sticky buns.


But I didn't pick out the raisins! I added extra instead!


This is a healthier alternative to sticky buns, so it's perfect for the everyday breakfast. We toasted it & spread apple butter & Cookie Butter (from Trader Joe's!) on it. Yum!


There's something so beautiful about a simple loaf of bread.


See the raisin peeking out of the end? I picked that out & ate it immediately. :-)


I have a few slices left to share, but better yet, make your own! It may seem like a lot of time, but you don't have to do much but wait. While it's rising you can sing some Christmas carols & do all the other final Christmas prep, like decorate the tree, put up your nativity scene, watch a fun movie, or finish wrapping presents.

Enjoy!


Whole Wheat Cinnamon Raisin Bread
Adapted from EatLiveRun
Yield: 1 loaf

Dough
1/2 cup warm milk (I used unsweetened almond milk)
1/2 cup warm water
1 (1/4th oz) package yeast
2 tsp. + 1/3 cup sugar
3 Tbsp softened butter
1 1/3 cups whole wheat flour
1 2/3 cups unbleached all purpose flour
1 1/4 tsp salt
2 Tbsp cinnamon

Filling
3 Tbsp. cinnamon
3 Tbsp. softened butter
1 Tbsp. sugar
1/3+ cup raisins (optional, but highly recommended!)

Pour milk & water into a small bowl (or measuring cup) & heat to about 100*F. If you stick your finger into the liquid, it should feel about the same temperature as your finger. Combine yeast & 2 tsp. sugar in the bowl of a stand mixer* & add the warm milk & water. Let sit for about 10 minutes or until foamy.

Once foamy, slowly add the flours, 1/3 cup sugar, butter, salt & cinnamon to the yeast mixture. Use a dough hook attachment & start to mix on slow. Mix on medium low for 4-6 minutes or until smooth & elastic.

Spray a large non-metal bowl with cooking spray & place dough ball in it. Cover dough with a cloth & let rise for 1.5 hours in a warm spot. If your house is chilly, briefly heat the oven to about 200*F, turn it off, & place the covered bowl in the warm oven to rise. Just make sure not to turn on the oven while it's inside!

For the filling, combine the softened butter with the cinnamon & sugar in a small bowl until smooth. Lightly spray a bread pan with cooking spray.

Once the dough is done rising, roll it out on the counter to form a long rectangle that is about as wide as your bread pan. Spread the filling mixture onto the dough. Sprinkle generously with raisins. Starting at one of the short ends, roll the dough tightly to form a log. Place in prepared bread pan & cover again. Let rise for about 1 hour, or until it doubles in size.

Preheat oven to 350*F. Bake for 40 minutes. Remove from pan immediately & cool on a rack. Once cool, slice & enjoy! Store loaf in a plastic bag at room temperature for 4-6 days for freshest results. Bread can also be tightly wrapped & frozen for about 2 months.

*Alternatively, if you do not have a stand mixer, you can knead the dough by hand. Stir the flour, 1/3 cup sugar, butter, salt & cinnamon into the yeast mixture. Turn dough out onto a floured surface & knead for about 8 minutes or until smooth. & elastic.

December 13, 2011

Catching Up

I haven't cooked dinner in over a week, so I haven't had anything to share. We've had so many family dinners, church dinners, & friend dinners that my kitchen is wondering what happened to me.


All I've really been cooking is oatmeal & sweet potatoes.

To note: it's totally possible to burn oatmeal to a blackened char in the slow cooker. I set it on high, planning to turn it to low right before I went to bed. I woke up at 3am, wondering who was baking cookies because the house smelled delicious. Then the smell woke me up again a little before 6am & I leaped out of bed to go turn it off. We still had breakfast, but we also had charred gunk to throw away. Yum.

Since I don't have a recipe or many pictures to share, here's a couple interesting links:

  • 3 Truths About Weight Loss You Need to Know - This is a concise article that I think really puts things into perspective. About 2 months ago I went from weighing myself almost every day to only weighing myself once every week or 2. My weight hasn't changed, & I feel better about not constantly monitoring it.

  • Stairs Get You There Faster Than Elevators - Studies prove that in a building with multiple levels (such as a hospital) people coud save 14 minutes a day just by using the stairs! I'm a stair climber myself - I probably got it from my mom who climbs every stair she comes across. We went to Italy & rented a small place that was over 80 stairs up.

December 9, 2011

Warming Foods

I'm cold.

The fall weather seemed to last so long this year! It's winter now, though. I finally got out my winter jacket after getting chilled all the way through last weekend at the parade.

I shouldn't complain because so many people in this world are perpetually cold. They don't have any way to warm themselves at all. For us, there are plenty of ways stay warm, including wearing sweaters, gloves, hats, & coats, wrapping up in a nice blanket, drinking a mug of tea, or sitting by a blazing fire. I'm very thankful for those comforts.

The Bup told me that he's been extra cold this year. His office at work is chilly, our house temp is set at 65, & winter's just beginning!

In addition to all the ways we can wrap our bodies in warmth, I went searching for ways to feed us that will warm us up from the inside out.  I ran across the idea that baking/roasting your foods makes them more warming to the body. There was a conflicting notion, however, that raw foods keep you warm because they require extra energy to bring to body temperature & digest. Either way, a good balance is healthy & I really love feeling that warm blast of air when I open the oven door!

Here's a list of naturally warming foods that I found & compiled for you! I know we'll be using it to eat from through the winter. It's supposed to be a cold one.

*Foods with a Warming Energy*

Herbs & Spices:
Anise
Basil - Basil Almond Pesto
Black & white pepper
Caraway
Carob
Cayenne - Pinto Spelt Burgers
Chives
Cinnamon - Pumpkin Banana Muffins
Cloves
Coriander
Cumin - Roasted Curried Root Vegetables
Dill
Fennel
Garlic - Roasted Garlic & Kale Spread
Ginger - Apple Pumpkin Beer Bread
Ginseng
Nutmeg - Hot Cross Buns
Paprika - Cajun Seasoning Mix
Parsley
Rosemary
Tea (beverage)
Turmeric

Nuts, Seeds & Grains:
Chestnuts - Roasted Chestnuts
Millet - Vegetable Millet Salad
Oats - Crock Pot Steel Cut Oats
Pine nuts
Quinoa - Curried Pumpkin Quinoa Soup
Rice milk
Sunflower seeds
Walnuts
Wasabi
Wild rice - Wild Rice, Pumpkin & Cannellini Soup

Condiments & Sweeteners:
Brown sugar
Honey - Honey Mustard & Onion Potato Wedges
Horseradish
Rice wine or vinegar
Vinegars - Rossetti's Italian Vinaigrette

Fruits & Vegetables:
Carrots - Carrot Spice Cake
Chili peppers
Coconut - Poppity Popcorn
Dates
Green onions
Green/red bell peppers - Pepper-only Pizza
Kumquat
Leeks
Mustard greens
Onion - Attempting Chipotle Burritos
Papaya
Parsnips
Root vegetables - Roasted Beets
Rutabaga
Scallions
Squash - Roasted Curried Butternut Squash
Sweet potatoes - Sweet Potato Beer Fries
Watercress


Eat well & stay warm!


[My main sources were herehere, & here.]

December 6, 2011

Fruity Sangria


Yum.

It was a food & fun filled weekend.

1. Sort of sleeping after an evening with some great girls!

2. Eating Saturday morning bagels & playing Bananagrams

3. Marching in the Christmas parade through town

4. Roasting an entire huge pumpkin & eating at least half of it (Why am I not orange yet? I can't get enough of this stuff!!)

5. Decorating our Christmas tree

6. Reading a hilarious version of the 12 Days of Christmas

7. Drinking Sipping Chocolate from Trader Joe's

8. Watching the children's Christmas program at church

9. Having lunch with my church family

10. Baking 10 kinds of cookies with the Bup, Mom & Pops

11. Eating a zillion cookies & loving every bite

12. Trying out the new elliptical


Fruity Sangria
Serves 6

1 bottle of dry red wine(750 mL)
2 c fruity blush wine
8 oz. seltzer water
2/3 c orange juice
1/4 c brandy
1/3 c Triple Sec
1 orange
1 apple
1 lemon
1 lime
1 c pineapple chunks, fresh or canned

Thinly slice the orange, lemon & lime, peeling off some of the rinds to eliminate any bitter flavor. Core & thinly slice the apple, keeping the peel in tact. Combine all of the fruit in a large pitcher or other glass container (I used our sun tea container!). Pour both wines, seltzer water, orange juice, brandy & triple sec over the fruit. Stir gently with a large spoon to combine. Refrigerate 12 hours or overnight. Enjoy cold, garnished with the soaked fruit.

December 3, 2011

Quick & Easy Stuffed Potatoes


Is it too much to ask for my nail polish to stay on more than 12 hours?

The process of cooking dinner means that I have my hands in water almost every night. Between washing & chopping veggies, cleaning lettuce, & washing dishes, there's always water involved.

That means that anytime I put on nail polish, it's a waste of my time. I try to time it so that I only paint my nails if I know I'm not cooking the following night or we're having something super simple.

For example:
On Wednesday, I painted my nails. Thursdays we always have dinner at my parents' house & Friday I had plans with some friends. I was really hoping it would last till church on Sunday. But no, I woke up on Thursday, did yoga, showered, & noticed that 4 of my nails had already chipped.

It must be a sign. I'm not destined to be a nail polish girl. I love that shine, though! There are much worse things that I could be bothered about, for sure.

Annnnnyway. About these potatoes. They're quick enough that you'll have time to paint your nails, but you better wait until after you make them.

It only took me about 40 minutes to cook, eat & clean up from these. Not too shabby for a healthy meal made from whole foods! We paired them with a big tossed salad, our usual dinner accompaniment.

They were full of flavor & suprisingly filling. I especially liked the slight crunch from the cauliflower & the hint of cheesiness from the nutritional yeast. You could sub in cheese if you'd prefer, but I'm obsessed with this stuff & it's super healthy. This is a great meal for those nights when you're rushed but still want something healthy & satisfying.

Quick & Easy Stuffed Potatoes
Serves 2

2 large potatoes
1 c chopped cauliflower florets
1 1/2 c chopped Swiss chard
1 1/2 T nutritional yeast (substitute parmesan or cheddar cheese, if you'd prefer)
1 tsp. liquid smoke
1/2 tsp. garlic powder
1 tsp. dried minced onion
1/2-3/4 c unsweetened almond milk
1/2 tsp. salt
1/4 tsp. black pepper
paprika, for garnish

Poke potato skins with a fork. Cook potatoes in the microwave (wrapped in a damp paper towel) using the microwave's preset button (about 5-7 minutes).  While they are cooking, lightly steam the cauliflower. Slice potoatoes in half and scoop out the insides. Reserve the potato skin shells for later. In a large bowl, mix potato insides, cauliflower, Swiss chard, nutritional yeast, liquid smoke, garlic powder, dried minced onion, 1/2 c unsweetened almond milk, salt & pepper. Heat mixture in microwave for 2 minutes. Mash until only slightly chunky. Microwave for another 2 minutes. If mixture is dry, add additional almond milk until you reach desired consistency. Spoon mixture into reserved potato skin shells, filling generously. Sprinkle with paprika & serve hot!

*Alternately, you can bake the potatoes in the oven, but that will take much longer.

December 1, 2011

Roasted Garlic & Kale Spread


What if every night could be pizza night? I think it'd take me a pretty long time to get tired of pizza, especially with all of the varieties out there. We make 2 pizzas so that there are leftovers for lunches. One is always topped with bbq sauce, the Bup's favorite & a standard in our house. The other one is always different & I like to experiment a little.

I wanted to try carmelized onions & pears, but that got vetoed. :-( Maybe next time...

Instead, I made up a roasted garlic & kale spread, inspired by Ashley's Kale Pesto. We had 2 heads of garlic that were ready to sprout, so I roasted them before they went bad. Roasted garlic is fancy. The garlic turns creamy & spreadable after a short time in the oven., transforming it into a different food altogether.


We used the spread as a sauce on the pizza, but I can see it being great as a topper for baked potatoes or crusty bread, a spread in a sandwich/wrap, or mixed with pasta. I have some leftover to use!

Roasted Garlic & Kale Spread
Inspired by Ashley's Kale Pesto
Yield: about 1 cup

2 heads of garlic
1 tsp. olive oil
2 c kale, chopped (about 100g)
juice of 1 lemon
1/4 tsp. salt
1/4 tsp. black pepper
1/3 c roasted hazelnuts

Preheat oven to 350*F. Slice off the top of the garlic heads, to expose the tops of the cloves. Wrap each head seperately in aluminum foil & drizzle each head with 1/2 tsp. of olive oil. Bake for 25-30 minutes or until garlic is soft. Squeeze cloves out of the husks. Place garlic & remaining ingredients into a food processor or blender & blend until combined. I left mine with some chunks, but if preferred, continue to blend until smooth. Taste & add additional salt and/or pepper if desired. Store extra spread in an airtight container in the refrigerator or freezer for future use.
Related Posts Plugin for WordPress, Blogger...